Hazard perception practice: how to pass first time

13 August 2026

Hazard perception practice: how to pass first time

Start with the Gov, run the free tutorial clip, then move immediately to full 14-clip mock runs on a realistic paid platform. That single shift, from watching random clips to timed end-to-end mocks, is what separates candidates who scrape through from those who pass comfortably.

The numbers are fixed and worth knowing cold before you sit down to practise:


  • 14 video clips in the test, lasting roughly 15 minutes in total
  • 15 scorable developing hazards across those clips (one clip contains two)
  • Pass mark: 44 out of 75 — and you must pass both the multiple-choice and hazard perception sections on the same day to earn your certificate
  • Each developing hazard scores 0–5 points ; earlier correct clicks score higher

Start here: GOV.UK free practice clips, one realistic paid app with full mock tests, and a desktop browser for exam parity.

A developing hazard, as GOV.UK defines it, is anything that would cause a driver to change speed or direction. Not every movement on screen qualifies. That distinction matters more than most candidates realise.


Key takeaways

Consistent full-mock practice on DVSA-supplied clips, combined with early-recognition drills and a clear score target of 50/75, gives you the best chance of clearing the 44/75 pass mark on test day.

Point Details
Pass mark and test format Score at least 44/75 across 15 developing hazards in 14 clips; pass both theory sections on the same day.
Click early, not late The scoring window opens at 5 points and closes as the hazard develops; waiting for certainty costs points.
Avoid patterned clicking Rhythmic or rapid clicking triggers the inappropriate-response algorithm and scores the clip zero.
Practise full mocks on desktop Run complete 14-clip timed tests on a desktop to match exam conditions and build concentration endurance.
Costello's Driving School Instructor-led lessons across Essex, Suffolk, and East London reinforce real-world hazard awareness alongside test technique.

Table of Contents

Where to practise hazard perception in the UK

The official starting point is the GOV.UK practice portal, which provides a short tutorial video and three free practice clips. These are genuinely useful for learning the format and the click interface, though GOV.UK is clear that the practice clips are not the same ones used in the real test. Think of them as a calibration tool, not a revision library.

Beyond the official clips, the two most widely used UK platforms are:


  • Theory Test Online (theory-test-online.co.uk): Uses DVSA-supplied clips and offers full 14-clip mock tests with score breakdowns. The clip labelling is transparent, which matters when you want to know whether you are practising on genuine DVSA footage or a CGI simulation.
  • TheoryPass (theorypass.co.uk): Provides full mock tests, clip-by-clip feedback, and clearly distinguishes between DVSA-supplied and simulated clips. Paid subscription, with a free trial available.

The DVSA also published an introductory hazard perception video on YouTube that walks through the format before you attempt any clips.

 Why clip realism matters: CGI and simulated clips can train you to spot artificial hazards that behave differently from real-world footage. If a practice site does not label its clip source, treat it with caution.

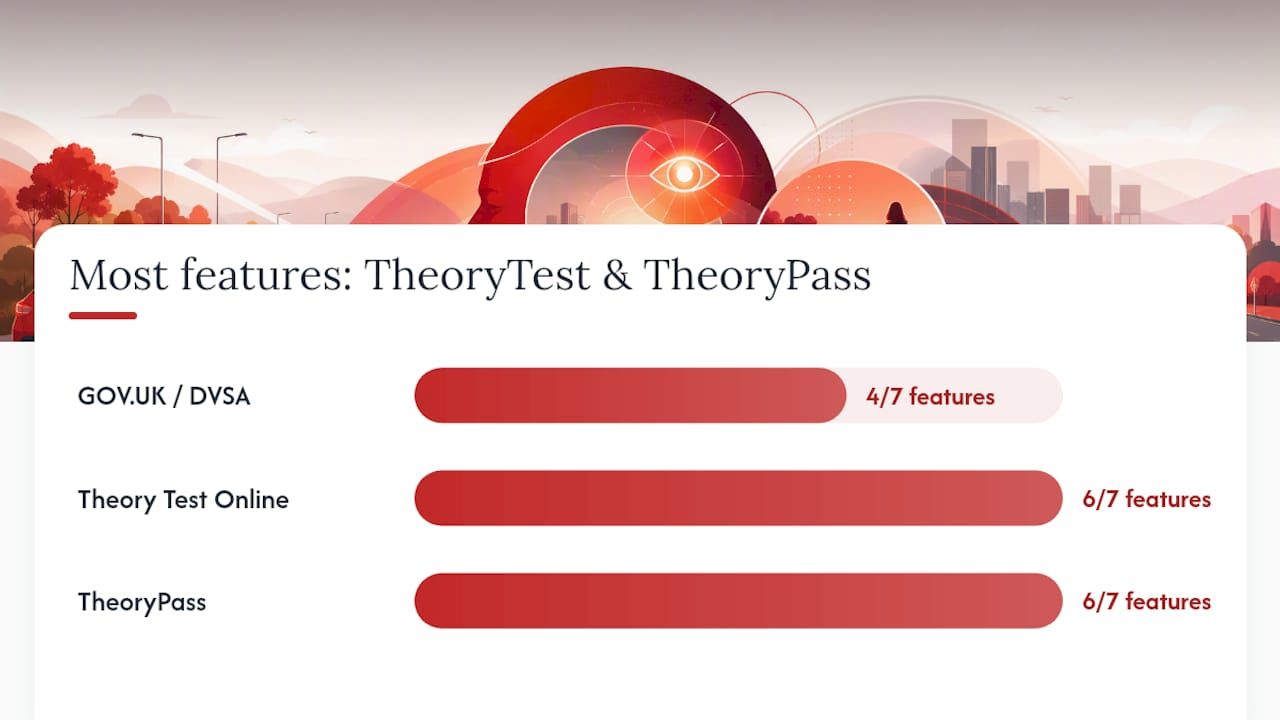
Feature GOV.UK / DVSA free clips Theory Test Online TheoryPass
Clip realism DVSA-supplied DVSA-supplied DVSA-supplied + labelled simulated
Free vs paid Free (3 clips + tutorial) Paid (free trial available) Paid (free trial available)
Full 14-clip mock tests No Yes Yes
Clip-by-clip feedback No Yes Yes
Inappropriate-click detection No Yes Yes
Desktop compatible Yes Yes Yes
Mobile compatible Yes Yes (reduced fidelity) Yes (reduced fidelity)

 Platform advice: use a desktop or laptop wherever possible. The official test is taken on a desktop computer, and practising on a small touchscreen trains a different click response. Mobile apps are fine for short drills on the go, but run your full mock tests on a desktop.


How does DVSA hazard perception scoring work?

Each of the 15 developing hazards carries a maximum of 5 points, giving a total of 75 available. The pass mark is 44. The scoring is graduated across a response window, and the window closes as the hazard develops.

Here is how a single hazard's scoring window works in practice:


  1. 5 points: You click at the earliest moment the hazard begins to develop, before it becomes obvious.
  2. 4 points: You click slightly later, as the hazard becomes more apparent.
  3. 3 points: You click once the hazard is clearly forming.
  4. 2 points: You click as the hazard is well underway.
  5. 1 point: You click very late, just before the window closes.
  6. 0 points: You miss the window entirely, or your clicking pattern triggers the inappropriate-response algorithm.

The clip that contains two developing hazards is scored independently for each one. Missing the first does not affect your score on the second.

Scoring fact: GOV.UK confirms that each developing hazard scores up to 5 points. With 15 hazards across 14 clips, the maximum is 75 and the pass mark is 44.

 The inappropriate-response algorithm is the rule most candidates do not know exists until they fail. A DSA Freedom of Information response confirms that clicking in a repetitive pattern, or making a large number of rapid clicks in a short period, causes the entire clip to score zero. The system treats this as an attempt to game the test. Clicking rhythmically every two seconds, or hammering the mouse when you are unsure, will wipe out your score for that clip regardless of whether you clicked at the right moment.

The practical rule: click once when you see a hazard developing, and click again only if the hazard continues to develop in a new way.


A practical practice plan and test-day strategy

A structured approach over one to two weeks produces far more reliable results than sporadic clip-watching. Here is a schedule that works:


  1. Days 1–2 (orientation): Watch the DVSA tutorial clip on GOV.UK. Run the three free practice clips. Note your click timing and whether you are clicking early or waiting for certainty.
  2. Days 3–4 (short-clip drills): Use a paid platform to run individual clips, pausing after each to review the score and the feedback. Focus on identifying the earliest sign of a hazard, not the obvious one. RAC Drive recommends watching for brake lights, pedestrians stepping towards the road, and vehicles pulling out as early indicators.
  3. Days 5–7 (first full mocks): Run complete 14-clip tests under timed conditions. Do not pause between clips. Log your total score and note which clip types cost you points.
  4. Week 2 (consolidation): Alternate between targeted short-clip drills on your weak hazard types and full mock runs. Aim for at least three full mocks before booking your theory test. New Driver Hub suggests moving to full mocks only once your short-clip timing is consistent.

 Combining both theory sections: the multiple-choice and hazard perception sections are sat on the same day. Build your revision plan so both are strong simultaneously. The complete guide to passing your test covers how to structure combined revision if you want a single resource for both parts.

 On test day: use the DVSA tutorial at the start of the hazard perception section, even if you have seen it before. It resets your focus. After each clip ends, take one slow breath before the next begins. This is a mental reset, not a pause, and it prevents a poor clip from affecting your concentration on the next one.

 Pro Tip: When a hazard keeps developing, for example a cyclist who wobbles and then moves into your path, click once when the wobble begins and once more when the direction change becomes clear. Two deliberate clicks on a genuinely evolving hazard are legitimate. Rhythmic clicking is not.


Common mistakes in hazard perception practice and how to fix them

Most candidates who fail do so for one of five reasons, and every one of them is correctable with the right practice habit. Practical guidance on spotting suspicious vehicle behaviour and registration issues can help develop early recognition skills, as explained in the Vehicle Registration Security Guide for UK Drivers.


  • Rhythmic clicking: Clicking at regular intervals to cover the scoring window. The DSA's FOI response confirms this triggers the inappropriate-response algorithm and scores the clip zero. Fix: practise on platforms that emulate the algorithm so you get immediate feedback when your pattern is flagged.
  • Waiting for certainty: Clicking only when the hazard is obvious. By that point, the 5-point and 4-point windows have already closed. Fix: short-clip drills focused on the earliest visible sign, such as a pedestrian's foot leaving the kerb, not their body stepping into the road.
  • Watching only the centre of the screen: Real hazards develop at junctions, on pavements, and from parked vehicles at the edges of the frame. Fix: practise peripheral scanning by consciously sweeping the full width of the clip during drills. Night driving scenarios are particularly demanding here; night driving tips cover scanning techniques that transfer directly to low-visibility clips.
  • Overreliance on low-quality or unlabelled clips: Practising on CGI clips that behave differently from real footage trains the wrong instincts. Fix: use platforms that label their clip source and prioritise DVSA-supplied footage.
  • Poor mock test pacing: Treating each clip as a separate exercise rather than part of a 15-minute continuous test. Concentration drops after clip 8 or 9 for most candidates who have not practised full runs. Fix: always complete the full 14-clip sequence without stopping.

 Pro Tip: Simulate test pressure by running two full 14-clip mocks back to back with no break between them. It feels harder than the real test, which means the real test feels manageable. This is the single most effective way to build the focus endurance the test demands.


How to choose the right hazard perception practice test

Not every practice product is worth your time or money. Use these criteria before committing to a platform:


  • Clip realism: Does the site use DVSA-supplied clips, and does it say so clearly? If it does not label its clips, assume they are simulated.
  • Full mock test availability: Can you run a complete 14-clip timed test? Short-clip-only platforms are useful for drills but insufficient as your primary revision tool.
  • Feedback quality: Does the platform show you where in the scoring window you clicked, which hazards you missed, and why? Score-only feedback tells you very little.
  • Inappropriate-click detection: Does the platform flag or penalise patterned clicking? Without this, you will not know whether your clicking habit would zero a clip in the real test.
  • Platform compatibility: Desktop for full mocks; mobile acceptable for short drills only.
Scenario Recommended approach
Just starting out GOV.UK free clips + tutorial to learn the format
Building timing accuracy Short-clip drills on a paid platform with clip-by-clip feedback
Two weeks before test Full 14-clip mocks on desktop, three or more runs
Struggling with specific hazard types Targeted drills on those clip categories, then return to full mocks
Mobile only available Short drills acceptable; book desktop time for full mocks

A high-quality paid provider will offer labelled DVSA clips, full mock runs, detailed per-clip feedback, and inappropriate-click detection. If a platform is missing two or more of those, it is not worth paying for. Book Theory Tests provides a useful breakdown of test format and hazard types if you want additional context before choosing a platform.


How to track your progress and set score goals

Tracking your scores across sessions turns vague improvement into something you can act on. The metrics worth logging after every session:


  • Average score per clip (total session score divided by number of clips attempted)
  • Full-mock total (your score out of 75 on each complete run)
  • Consistency (how much your score varies between mocks; a narrow range is a better sign than one high score surrounded by low ones)
  • Hazard types missed (junctions, pedestrians, cyclists, large vehicles; note which categories cost you points most often)

A simple weekly tracking template:

Aim to hit 50/75 consistently in practice before booking your theory test. The 44/75 pass mark leaves a buffer of 6 points, but candidates who practise to exactly 44 often find that test-day nerves erode that margin. Practising to 50 gives you a genuine cushion. Three full mock runs scoring above 48 on a realistic platform is a reasonable threshold for booking with confidence.


Why full mocks beat endless random clips

The conventional advice is to practise as many clips as possible. More clips, more exposure, better score. It sounds logical, and it is mostly wrong.

What the research on skill acquisition actually shows is that performance under pressure depends on practising the conditions of the test, not just the content. Watching 200 individual clips in isolation trains clip recognition. Running complete 14-clip timed tests trains concentration endurance, which is the thing that actually fails candidates in the room.

By clip 10 of a real test, a candidate who has only ever practised short drills is running on depleted focus. Their click timing slows, their peripheral scanning narrows, and they start waiting for obvious hazards rather than early ones. That is when the 5-point and 4-point windows close before they react.

Costello's instructors see this pattern consistently. Learners who arrive having scored well on short drills but never completed a full mock often underperform on test day, while those who have run five or six full timed sequences tend to find the real test feels shorter and less pressured than practice. The mock driving test guide covers the same principle for the practical test: simulating the full experience is what converts preparation into performance.

There is also a subtler point about early recognition. Candidates who practise only on low-quality or CGI clips develop a slightly wrong mental model of what a developing hazard looks like. Real DVSA footage has the texture and ambiguity of actual roads. Practising on it means your instincts are calibrated to the right signal, not a tidied-up simulation.


Costello's Driving School supports your full theory preparation

Passing the hazard perception section is not just about clicking at the right moment. It is about building the road awareness that makes those clicks instinctive, and that is where instructor-led preparation makes a measurable difference.
Costello's Driving School offers combined theory and hazard perception support across Essex, Suffolk, and East London, with DVSA-approved instructors who use real-world hazard scenarios during lessons to reinforce the same early-recognition skills the test measures. Rather than practising in isolation, learners who take lessons alongside their theory revision develop genuine hazard awareness, not just test technique. The school's Guaranteed Pass packages and driving lessons are available across Chelmsford, Colchester, Ipswich, Hornchurch, and East London. To find out which package fits your timeline, visit Costellosdriving and get in touch with the team directly.


Sources

The following official and reputable UK resources are worth bookmarking as you prepare:

Recommended
21 August 2026
Wondering how many driving lessons you need to pass your test? Discover key factors influencing your readiness and gain confidence on the road!
20 August 2026
Discover what to expect on Colchester driving test routes, from starting at Grange Way to mastering roundabouts and speed limits.
20 August 2026
Discover how a semi intensive course can accelerate your driving skills with flexible lesson schedules, helping you reach test readiness faster.
19 August 2026
Mastering Ipswich driving test routes is essential for success. Learn key roads and maneuvers to boost your confidence and pass the test.
18 August 2026
Master your driving test in Hornchurch by familiarizing yourself with key routes and junctions. Boost your confidence and pass your test!
18 August 2026
Discover Chelmsford's driving test routes from Hanbury Road. Get essential tips, local hazards, and sample routes to ace your test!
17 August 2026
Discover the costs of driving lessons in the UK for 2026. Budget between £1,500 and £2,500 for your journey to a first-time pass.
17 August 2026
Unlock your potential as a driving instructor with a PDI trainee licence. Get your application ready and start earning while you train!
14 August 2026
ADI Part 3 lesson planning: pass with confidence To pass the Lesson Planning element of the ADI Part 3 test, you must demonstrate four specific behaviours: identifying your pupil's learning goals and needs, agreeing an appropriate lesson structure, selecting suitable practice areas, and adapting the plan when the pupil's performance or safety demands it. Get those four right and you are demonstrating exactly what the Part 3 test report form expects to see. The test runs for approximately 45 minutes total : around 40 minutes of actual driving, a briefing of up to 3 minutes before the lesson begins, and a reflection period of up to 3 minutes at the end. Every second counts, so know your timings before you sit down. Before the lesson starts, run through this checklist mentally: State a clear, agreed learning goal with your pupil Name the practice area or route you have chosen and why Identify one key risk relevant to the lesson theme Confirm how you will check progress during the drive Have a fallback plan ready if the first approach is not working Pro Tip: Write your pre-lesson script on a card and rehearse it aloud until it sounds natural. Examiners can tell the difference between a candidate who has internalised client-centred thinking and one who is reciting a formula. Key takeaways Passing the ADI Part 3 lesson planning element requires four demonstrable behaviours: agreed pupil goals, a well-structured plan, a justified practice area, and confident, explained adaptation when the lesson demands it. Point Four core competences Identify goals, agree structure, choose practice areas, and adapt: all four must be evidenced. Test timings 45 minutes total: up to 3 minutes briefing, 40 minutes driving, up to 3 minutes reflection. Scoring thresholds: 0-30 is a fail. 31 — 42 is Grade B. 43—51 is Grade A, per GOV.UK. Adaptation is assessed changing the plan without explanation loses marks; changing it with a clear reason gains them. Costello's Driving School offers mock Part 3 tests and lesson-plan support that is mapped to DVSA criteria across Essex, Suffolk, and East London. What do examiners actually assess in lesson planning? The examiner marks your lesson using the DVSA national standard, recording evidence against 17 lower-level competences grouped under three high-level areas: lesson planning, risk management, and teaching and learning strategies. Lesson planning sits at the top of that list for a reason. Without a credible plan, the rest of the lesson has no foundation. The four lesson-planning competences map to observable actions the examiner will look for during the pre-lesson exchange and throughout the drive. Identifying pupil goals and needs You ask about hours of tuition, other practice, and recent driving experience You invite the pupil to name their own strengths and areas for development You confirm a specific, agreed learning goal before the car moves Agreeing an appropriate lesson structure You describe a logical sequence of activities that matches the pupil's current ability You explain how the lesson will build from a starting point to a stretch goal The pupil understands what is happening and why Choosing suitable practice areas You name a specific area or route and explain why it suits the lesson theme The route offers opportunity for repetition and progressive challenge You acknowledge any hazards or limitations in the chosen area Adapting the plan You respond to what the pupil actually does, not what you expected them to do You explain any change in plan to the pupil and check their understanding You do not persist with an approach that is clearly not working The Part 3 test report form is the authoritative checklist the examiner uses. Aligning your lesson plan directly to its structure reduces the chance of missing demonstrable evidence. How do you plan a 40-minute ADI Part 3 lesson? Structure is everything. A well-timed lesson signals to the examiner that you are in control of the teaching process, not just reacting to events. Here is a framework you can adapt for any lesson theme. Timing breakdown Phase Duration What happens Pre-lesson exchange Up to 3 minutes Examiner asks questions; you brief the pupil on goals, route and risk Opening activity 3 minutes Confirm stated strengths/weaknesses through a short practice task Core practice around 40 minutes Repeated, progressive practice on the lesson theme Consolidation up to 3 minutes Pupil applies skill more independently; you reduce prompts Reflection Up to 2 minutes Pupil-led review of progress against the agreed goal The GOV.UK guidance confirms that candidates may stop safely during the lesson to give immediate feedback where necessary. Build one or two natural pause points into your plan so feedback does not feel forced. Three annotated 40-minute lesson templates Template 1: Roundabouts Learning goal: Select the correct lane and exit a multi-exit roundabout safely and confidently Practice area: A quiet single-lane roundabout for the first 10 minutes, then a busier two-lane roundabout for the core practice phase Risk note: Emerging too early; failure to give way to traffic already on the roundabout Observe: Approach speed, lane discipline, signal timing, mirror use on exit Progression: Move from instructor-prompted to pupil-initiated lane selection Fallback: If the busier roundabout overwhelms the pupil, return to the quieter one for consolidation Template 2: Junctions and town driving Learning goal: Emerge safely from T-junctions and crossroads in a busy town environment Practice area: A town-centre circuit with a mix of give-way and stop junctions, varying traffic density Risk note: Creeping into the path of oncoming traffic; misjudging gaps Observe: MSPSL routine, effective observation before emerging, speed on approach Progression: Introduce a more complex crossroads once T-junctions are consistent Fallback: Reduce to quieter side streets if observation is unsafe Template 3: Dual carriageway preparation Learning goal: Join and leave a dual carriageway safely, matching motorway-speed traffic Practice area: An A-road dual carriageway with a slip road; return via a quieter route for debrief Risk note: Failure to reach safe speed on the slip road; lane discipline at speed Observe: Acceleration on the slip, mirror-signal-manoeuvre sequence, following distance Progression: Introduce overtaking if the pupil is confident and conditions allow Fallback: Remain on the approach road and practise the slip road entry repeatedly Pro Tip: Plan a circuit, not a linear route. A circuit lets you repeat the same junction or roundabout two or three times without retracing your steps, which is far more efficient use of 40 minutes. How do you choose the right practice areas? Route selection is one of the most underestimated parts of ADI Part 3 lesson planning. A poor route choice can undermine an otherwise solid lesson, and examiners notice when a candidate drives to an area that bears no relation to the stated learning goal. Criteria for a suitable practice area: Safety first: the area must be manageable for the pupil's current ability Opportunity to repeat: the pupil should encounter the target skill multiple times Progressive challenge: the route should allow you to increase difficulty as confidence grows Quick adaptation: you must be able to change direction or reduce complexity without a lengthy detour Matching routes to lesson themes: Roundabouts: start on a quiet estate roundabout, progress to a multi-exit town roundabout Town junctions: use a town-centre loop with varied junction types and traffic levels Dual carriageway: choose a slip road with adequate acceleration distance and light traffic for a first attempt Rural roads: select a B-road with bends, crests and passing places, avoiding high-speed A-roads for early-stage pupils Manoeuvres: a quiet residential street or car park for initial practice, then a busier environment for the Part 2 test manoeuvres consolidation phase Safety checklist to state aloud if asked: "I've chosen this area because it matches [pupil's current ability level]." "The traffic density here gives us enough challenge without unnecessary risk." "If [specific hazard] occurs, I will [specific action]." Risk management is not a separate competence to lesson planning. It runs through every decision you make about where to drive and what to practise. Weave your risk rationale into the briefing naturally rather than treating it as a box to tick. How and when should you adapt the lesson? Adaptation is where many candidates lose marks. Either they stick rigidly to a plan that is clearly not working, or they abandon the plan so completely that the lesson loses direction. Neither impresses an examiner. Scenario 1: The pupil is overwhelmed The pupil stalls twice approaching a busy roundabout and their observation is deteriorating. Do not persist. Pull over safely, acknowledge what you have seen, and adjust the plan. Say: "I can see the roundabout is feeling quite pressured at the moment. Let's take a different approach and spend a few minutes on a quieter junction first, then come back to this. Does that make sense?" Scenario 2: Unsafe behaviour The pupil is emerging from junctions without adequate observation. This is a risk management issue and requires immediate action, not a deferred debrief. Say: "I need to stop you there. Before we move off, I want to talk about what I saw at that junction, because I want to make sure we're both safe." Then address the specific behaviour, agree a strategy, and continue. Scenario 3: Unexpectedly strong performance The pupil handles the quiet roundabout confidently on the first attempt. Staying on the easy route wastes development time and signals poor assessment skills to the examiner. Say: "That was really well handled. I think you're ready for something a bit more challenging. Let's head towards [busier area] and see how you manage with more traffic." Dos and don'ts: Do explain the reason for any change in plan to the pupil Do check the pupil's understanding and agreement before changing direction Do keep the original learning goal in view, even if the route changes Don't abandon the lesson theme entirely without good reason Don't persist with a route or activity that is producing unsafe driving Don't change the plan so frequently that the pupil loses confidence in your direction What are the most common lesson-planning mistakes? Most candidates who fail the lesson-planning element make the same handful of errors. Knowing them in advance is half the battle. Common fail causes: Vague or absent learning goals ("We'll just see how you get on today") A practice area that does not match the stated lesson theme Ignoring the pupil's stated strengths and weaknesses when building the plan Running out of time because the opening activity was too long Refusing to adapt when the pupil's performance clearly demands it Failing to involve the pupil in agreeing the plan Examiner red flags: The candidate does all the talking in the briefing; the pupil has no input The route chosen is clearly too easy or too difficult for the stated ability level The candidate changes the plan without explaining why The lesson ends with no reflection and no reference to the original goal Rehearsal checklist (run through this before you get in the test vehicle): Can you state the pupil's learning goal in one sentence? Can you name the practice area and give one reason for choosing it? Do you have a fallback route ready? Have you timed your briefing? It must stay under 3 minutes. Can you name one risk specific to today's lesson theme? Do you know how you will check progress at the midpoint? How does the DES app record your marks and what do the scores mean? The examiner uses the DES app throughout the lesson to record evidence against the 17 lower-level competences across the three high-level areas. You will not see the screen, but understanding what is being recorded helps you direct your behaviour. Scoring thresholds Score Grade Outcome 0—30 Fail Test not passed 31—42 Grade B Pass 43—51 Grade A Pass. These thresholds are published on GOV.UK. Your completed report and grade are emailed to you after the test. Typical examiner questions before the lesson begins (sourced from DVSA examiner guidance): How many hours of tuition has the pupil had? Has the pupil done any private practice? What are the pupil's strengths? What are the areas for development? What is the plan for today's lesson? These questions are not small talk. Your answers are the first evidence the examiner records against the lesson-planning competences. Treat them as part of the assessment, not a warm-up. The three high-level competence groups are lesson planning, risk management, and teaching and learning strategies. Lesson planning feeds directly into risk management: a poorly chosen route or an unresponsive plan creates risk. The examiner sees those connections clearly, even when the candidate does not. How Costello's Driving School prepares ADI Part 3 candidates Costello's Driving School has been training DVSA-approved instructors for over 25 years across Essex, Suffolk, and East London. The ADI Part 3 training pathway is built around the same four lesson-planning competences the examiner marks, so candidates practise producing exactly the evidence the DES app is looking for. What the training pathway includes: One-to-one coaching sessions focused on pre-lesson briefing technique and route selection Mock Part 3 tests on real routes, marked using DVSA criteria Lesson-plan packs aligned to the themes on the Part 3 report form DES app familiarisation so candidates understand how evidence is recorded Guaranteed Pass options for candidates who want structured progression to test Pro Tip: Use your training sessions to practise the pre-lesson exchange as many times as possible. The briefing is incredibly important and it is the easiest part of the test to rehearse away from the car. Costello's instructors are all DVSA-approved, and the school's track record across Essex and Suffolk reflects a consistent focus on test-relevant teaching rather than generic driving instruction theory. A word on confidence from an ADI trainer Most candidates who struggle with the Part 3 are not struggling with driving. They are struggling with the shift from being a driver to being a teacher. The lesson plan is not a script to perform; it is a framework that shows the examiner you understand your pupil's needs and can respond to them in real time. The candidates who score Grade A are not the ones with the most elaborate plans. They are the ones who listen to the pupil, adapt without panic, and keep the learning goal in view throughout. That is a teachable skill, and it improves dramatically with deliberate rehearsal. In the 24 hours before your test: Drive the route you plan to use and note any hazards or changes since you last used it Run through your pre-lesson briefing script aloud, timing it to stay under 3 minutes Check your equipment, confirm your test time, and get a full night's sleep Costello's Driving School ADI Part 3 training packages Passing the Part 3 demands more than reading about lesson planning. You need to practise it, get feedback on it, and refine it against DVSA criteria before test day. Costello's Driving School offers one-to-one ADI Part 3 instructor training across Essex, Suffolk, and East London, with mock tests conducted on real routes and marked using the same DES criteria your examiner will use. Lesson-plan packs cover every theme on the Part 3 report form, and DES app familiarisation is built into every session so nothing on test day comes as a surprise. Package contents: One-to-one coaching sessions tailored to your current competence level Mock Part 3 test on a real route with full DVSA-criteria feedback Lesson-plan templates for every report-form theme Pre-lesson briefing rehearsal and examiner-question preparation Guaranteed Pass options available for structured progression With over 25 years of instructor training experience and DVSA-approved trainers throughout Essex and Suffolk, Costello's is the practical choice for candidates who want to arrive at their Part 3 test prepared, not just informed. Book your ADI instructor training today and start building the lesson-planning evidence your examiner needs to see. Sources Official DVSA guidance: Gov adi-part-3-test-report-form.pdf Costello's Driving School resources: Recommended ADI Part 3 training: what instructor candidates need Show me tell me questions: the complete 2026 guide Driving Lessons | Costello's Driving School Become an Instructor | Costello's Driving School
10 August 2026
Discover the latest UK driving instructor qualification pass rates, including ADI Part 3 pass rates at test centres across Essex.